Archive for the ‘Monday Menu’ Category

h1

Monday Menu: Barbecue!!

May 25, 2009

barbecue

When I was little, every so often my Mom would make up a big pot of pork chops in barbecue sauce for supper. I always loved the flavor, and how tender the meat was. When she made it, she usually used bone-in chops and cooked them in the sauce in the oven for a couple hours. The end result was very tasty and very “saucy,” and the only thing I didn’t really care for was the fact that I had to pick out the bones while eating dinner.

I started cooking this dish myself a couple years ago when I discovered the sauce recipe with Mom’s name on it in an old church cookbook. I have tweaked it so that the end result resembles something more like a pulled pork barbecue (even though the pork isn’t pulled). And I must say… YUM. This stuff is absolutely, 100% addictive. Which is to say, I doubt you can ever just take a bite and walk away. It’s hard to stop eating it! Very. Difficult. To. Stop.

Totally Addictive Pork Barbecue (by Laura, with apologies to Mom)

First, buy some pork chops. I have used boneless, bone-in, thick, thin, butterfly… you really only need the inexpensive “assorted chops” that you can often find in the meat case, but I have used the higher priced cuts when I don’t feel like messing with bones. Basically, I will snap up any of the meat when it gets marked down at the grocery, then put it in the freezer and make barbecue when I have several pounds of it to make use of. So… buy whichever cut you prefer, just make sure you have plenty of it. It’s nice to make a nice big pot of this stuff. I promise, it won’t last long.

To make the pot shown in the photo above, I had two trays of frozen “assorted chops” from the freezer section at Aldi, plus one other tray of assorted chops that had been just marked down at the Wal-mart grocery. The exact quantity of meat isn’t crucial. I let the frozen chops thaw about a day in the fridge to get them at flexible enough to work with.

Once you have your meat on hand and ready to work with… set it aside and get the sauce going first. 🙂

Set a large dutch oven on the stove top over medium-high heat with a couple tablespoons of canola oil in the bottom. Add 2 medium onions (chopped) and about 1 cup of chopped celery… let it start to cook and brown a bit. Add 2 cloves of minced garlic toward the end of browning time (so the garlic doesn’t burn).

To the mixture in the pan, add:

  • 3 cups water
  • 1 1/2 cups ketchup
  • 1/4 cup worcestershire
  • 1/4 cup vinegar
  • 1/4 cup brown sugar
  • 2 tbsp. lemon juice (or the juice of one large lemon)
  • 2 tsp dry mustard (I usually just add a little prepared mustard)
  • 2 tsp salt
  • 1 tsp pepper

Stir it all together and let it reach a boil, then cut the heat back and let it simmer a bit OR just turn the heat off but leave the pan on the burner while you prepare the chops.

Now, pull out a large frying pan or something similar that you can brown your chops in… I like to use a cast-iron skillet. Turn the burner on medium-high to high heat and add a touch of oil to keep the chops from sticking too much. Add the chops in batches so that they can brown a bit before adding them to the sauce. If you are using bone-in chops, I guess you could leave the bones intact and pull them out of the pot after they’ve cooked, but I prefer to remove any bones before cooking because I don’t like to deal with them later.

Anyway, brown up the chops a few at a time, adding them to your dutch oven as you go. You may need to refresh your frying pan with a little oil between batches. Remember that the chops don’t have to cook through in the frying pan… you are just looking for some browning action to help with the flavor of the dish.

However much meat you are using, try to make sure the chops are fairly submerged in the sauce. Poke around and tuck them in as best you can. They don’t have completely disappear beneath the surface… once they start to cook down it should all work itself out… but there should be enough sauce to keep them from drying out.

Once all the chops are in the sauce, look at your frying pan. Did you get a nice brown layer of tastiness on the bottom?  Good! Now de-glaze that pan with a bit of tap water while the burner is still on… just enough water to loosen up the brown bits with a spatula. Then pour that liquid into your dutch oven with the chops and the sauce. and give it all a stir.

Oven temperature and cooking times can vary depending on how much time you have before you need to serve supper… but the general rule is, the longer you can let it cook, the better the end result. Here is the process I used to get the results shown above:

  • Cover the dutch oven and put in the oven at 300º
  • After about 5 hours, uncover the pan, stir and break up the pork into smaller pieces (it should be at the falling apart stage by then)
  • Turn heat down to maybe 225º and put the pan back in, uncovered.
  • Let it cook down and caramelize as long as you can stand to wait. Maybe another 2 or 3 hours? Turn the heat down even lower if you like, and do peek in now and then to give it a stir. If it looks like it might get too dry, put the lid back on.

This barbecue can be served in sandwiches OR plated up with your favorite side dishes.

Also, you can just stand there at the stove and eat it right out of the pan. It’s been known to happen. I’m just saying.

h1

Monday Menu: Warm memories and a side of cereal.

March 9, 2009

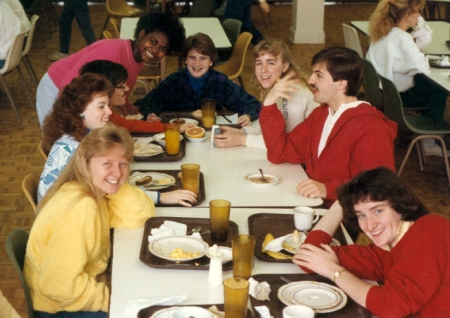
cafeteriagroup1

Everyone has to eat.

At Milligan College in the 1980s (1988 in the above photo), everyone had to eat in the dining hall on the first floor of Sutton Hall. There really wasn’t any other choice. With only 500-600 students back then, it was simple: if you lived in the dorms, you were automatically on the meal plan. Just show your student ID at the door as you enter, and go get your food.

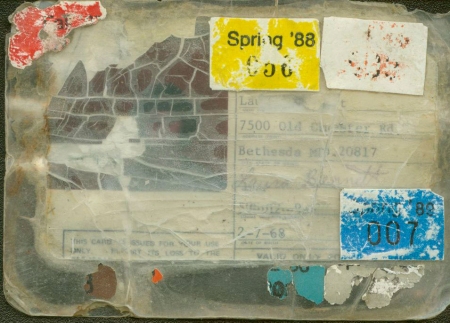
id1Here is a picture of my student ID. It barely survived all four years (thanks to a lot of careful ironing, and to a couple lucky times of finding it just before I had to have it replaced for being lost). I’m not sure how anyone could tell it was me in the photo after the first year or so, but I put the little stickers on it each semester, and they bought me access to all-I-could-eat college food. Whoohooo!

Much like the lobby of our dorm, the dining hall was a central part of campus life. Instead of MTV, though, we watched each other. And what a show it could be! Some of my favorite memories…

  • My sophomore year, when Pioneer Food Service first took over the cafeteria… They brought in a cereal dispenser that was made of plexiglass and held about eight different kinds of cereal, which replaced the prior method of having several large cereal boxes sitting on a table. Suddenly, all you had to do was pull a handle, and WHOOSH! out would come your Cocoa Puffs. Whether you had a bowl or not. And, they just kept coming until you pushed the handle back in place!  Needless to say, there was an adjustment period that involved a lot of cereal on the floor.
  • Stacking the salt and pepper shakers on top of each other, then seeing how far you could tip the stack before the top one fell off. Despite overwhelming evidence that you could not turn them all the way sideways, trials were constantly being conducted to prove otherwise.
  • Waiting until the person next to you was in the midst of saying grace, then leaning over and whispering “tell the Big Guy I said hello.”
  • Steak night once a week… all fancied up, with candles on the tables. Who knew that powdered coffee creamer was flammable?! We did!
  • Turning your soft drink over really quickly onto your tray, so that almost all the liquid stay trapped up in the tumbler. I don’t know what the purpose was here, other than to make more of a mess for the people back in the dishwashing line… but it gave us something to do.
  • The big toaster! You put your bread in the top, and then watch it come out the bottom, magically toasted. And sometimes it would get caught in the back somewhere, and start to catch fire.
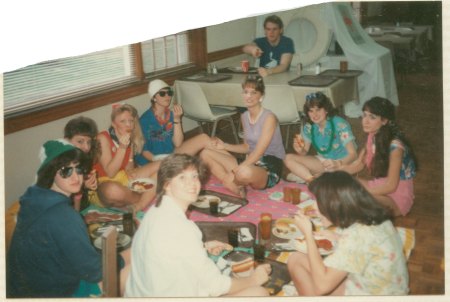
  • One incident of steak sauce being set out in a bowl along beachparty86with all the ice cream sundae toppings. It did kind of look like chocolate sauce…
  • Freshman year when we threw a beach party. Blankets instead of tables and chairs… sunglasses and hawaiian shirts… whoohooo!

Probably the best memory of the dining hall, though, is just the memory of seeing everyone there. If your best friends were majoring in completely different areas of study than you were, you knew you could catch up with them in the cafeteria at chow time. Freshmen, seniors, musicians, scientists, writers… we all picked up those brown trays and went through the line together to get our spaghetti. We all kept track of who was sitting with whom, and who put ketchup on their scrambled eggs. And we all poured our hearts out to our classmates in those conversations that are best had while fidgeting with those carrots that we didn’t want anyway.

Nowadays, I believe the dining plan is very different. I think it involves a limited number of meals in the cafeteria, with more students eating at the Student Union or even off campus as part of their normal routine. I just hope that everyone is spending at least part of every day sliding their trays along an entrée line, filling amber colored plastic tumblers with soft drinks, and occasionally spilling Captain Crunch on the floor. It just wouldn’t be right any other way.

h1

Monday Menu: Chicken Noodle Soup

January 19, 2009

chickensoup

I like Campbell’s as much as the next person, but homemade chicken noodle soup is not hard to make. Here’s how I do it… again, this is a recipe that is not so much about amounts as it is about methods:

Take several bone-in chicken breasts – I often use the frozen ones that come in the big plastic bags at Wal-Mart or Sam’s. Put the breasts in a large pot and cover with water, then set your burner on high to bring them to a boil.

Here’s a tip I read from Tom Colicchio of Bravo’s “Top Chef:” when the water  starts to boil a bit, and you start to see that scum develop on top?  Just dump it out. You can dump out all the water, save the chicken, then just refill the pot with fresh water and boil again. No one really likes scummy broth, and Tom says that  this early in the process, you aren’t sacrificing anything much in the way of flavor. We now resume our regular programming…

Once you have your pot boiling well, turn the heat down and let the chicken simmer for… oh, for however long you have. I like to let it simmer an hour at least, sometimes more. You might need 30-60 minutes later to finish it all off and serve it, so plan accordingly.

Once the chicken has simmered good and long, pull the pieces out with tongs and set them in a large bowl or on a cutting board to cool off a bit. Then if desired, you can skim the fat off the stock. I usually pour the stock into some large container, straining it as I go to catch any stray chicken parts or other nasty bits. In the end I have a nice, clean stock which I pour back into my pot and return to the stove.

At this point, add in chopped carrots, celery, and perhaps a little finely chopped onion (not much). Season with plenty of salt and pepper, and maybe some parsley. Depending on how much stock you ended up with and how many people you need to feed, you might decide to supplement with some canned broth or water and bouillon to reach the desired amount of soup.

Now that the chicken has cooled enough to handle, pull it off the bones and cut it up or just shred it with your hands and return it to the pot with the stock. Sometimes I have more chicken meat than I really need, so I save a couple breasts and put them in the fridge to make chicken salad the next day.

Once all the veggies and meat are in the pot, heat it up to boiling again and then add the noodles of your choice. I usually use the “No Yolks” extra wide ribbons, and I put a lot in so that there is a high noodle-to-broth ratio. You can adjust to your own preferences.

When the noodles are cooked, the soup is ready to serve!

h1

Monday Menu: Lentils and Sausage with Pasta

January 5, 2009

lentils-n-sausage-w-pasta

Mmmmmmm, lentils!  So yummy and good for you, and they don’t take all that long to cook like other dried beans or legumes.  This is a recipe that I made up on my own… which is not to say that it’s any sort of culinary breakthrough or anything. It’s one of my favorites, very filling and tasty.

[I’m not going to give amounts for this recipe so much as just tell you how I make it. This is one of those recipes where you can tweak just about anything in it to your taste.]

*Make sure you have a large covered frying pan, or maybe a dutch oven.

Start with a beef smoked sausage... you know the ones that are shrink wrapped in a big awkward U shape?  I buy Hillshire Farms brand. Now, you could say that you don’t eat beef and you could buy another kind of sausage. You could try turkey sausage or pork sausage or I’m-not-sure-what-meats-are-in-here sausage. But I’m telling you, beef tastes the best and you can live with a little fat. Also, I went for  jog this morning, how about you?

Now, take the sausage out of the shrink wrap and grab your 9″ chef knife and… ladies, please contain your laughter. I’m just saying. It’s really not that funny but… you’ll know what I mean. ANYWAY… cut up the sausage into bite size slices or smaller bits, and fry it up in a pan so that it gets nice and brown and starts to render down a bit. Remove the cooked sausage and let it drain on paper towels. This will give you time to get rid of the fat in the pan and maybe even clean it up a bit if things got too brown in there. I usually like to start the next step with a clean pan.

Return the pan to the burner and add in a little olive or canola oil. Add some chopped onions and celery and sautée a bit until it’s nice and soft… then throw in 2-3 cloves of fresh garlic (minced) and let it cook up a bit as well. You don’t want the garlic to get brown, though. Because everyone on the Food Network says that that is BAD.

Now, add your lentils to the pan. Maybe a one-pound bag of dried lentils? Something like that. I like to add them to the veggies in the pan and stir them around a bit. I pretend that this is a special secret method that gives the dish all its special flavor, but honestly it probably doesn’t make a difference how you do it. The main thing is, add the lentils and then add water, chicken broth, or a combination of the two. Be sure to add enough liquid to cover the lentils well (you may add more later on) and give everything a stir and then cover it and let it simmer a while. Lentils usually cook in 30-40 minutes I think. I let it get bubbling and then I check it now and then and add more liquid if it looks like it’s drying out. This is not rocket science. It’s lentil science.

Be sure to season with salt and pepper as you go along, according to your family’s tastes. I use kosher salt because Alton Brown says kosher salt is cool, and I want to be cool.

While the lentils are cooking, you can cook up your pasta. Here again is a critical point: the best tasting pasta on the planet is “Barilla Plus.”  It’s tasty AND has extra fiber and omega-3s or other things that will make you live for 100 years… so, go get that brand. You can thank me later. It’s delicious.  Use your favorite pasta shape here… it’s your party! But I recommend either penne (shown above) or angel hair. I cook up the pasta, drain it, then put it back in the pot and toss it with a little olive oil, and some parsley flakes. The olive oil gives it a little flavor. The parsley flakes make people think you are fancy.

To serve it up, just dole out a portion of pasta, put the lentil-sausage mixture on top, and add a bit of parmesan. The shredded kind is best but for the photo above, all I had at the time was the stuff from the shaker. It still tastes good!